
To add virtual tours to real estate photography, capture a set of 360° photos during the property shoot, connect them as scenes in a tour editor, and deliver a browser link alongside your normal photographs. Start with one small property and complete the entire process before adding the service to your price list.
A photo-based virtual tour is a collection of panoramas linked by clickable navigation points. It lets a buyer look around from each shooting position. It does not, by itself, provide a measured floor plan or a continuously navigable 3D model.
This walkthrough uses Mirame360, with screenshots captured from the live website on September 8, 2026. The demonstration uses two existing public architectural panoramas from Rome to show the actual controls. These are interface examples, not photographs of a residential listing or a timed property shoot. For your own tour, replace them with the rooms you photographed.
How to add virtual tours to real estate photography: define the deliverable
Offer a specific result: a connected tour of the agreed rooms, a viewing link, and an embed for the client's website if needed. Confirm the expected hosting period and whether the client needs a separate set of conventional listing photographs.
This addresses a practical concern raised by a real estate photographer on Reddit: adding tours to an existing photo, video, and drone package without making the workflow unwieldy.
Keep your first package simple. A complete, easy-to-follow tour of a small apartment is a better starting point than promising every possible interactive feature. If the client asks for dimensions, a dollhouse view, or a platform-specific scan, clarify that requirement before quoting. Those are separate deliverables from the linked panoramas covered here.
Step 1: plan and photograph the route through the property
Walk through the property before putting the camera down. Choose an opening view, identify the main rooms, and note the connections between them. An example route is entrance → living room → kitchen, with a separate connection from the entrance to the bedroom. It should reflect the actual layout.
Capture enough positions for someone to understand that route. A large open-plan space may need more than one viewpoint; an extra hallway panorama can make a transition understandable. Don't turn a doorway hotspot into a jump to an unrelated room.
Use a stable support and keep camera height consistent. Check windows, mirrors, the tripod area, and the edges where the camera stitches its lenses together. Trigger the camera remotely or use its timer so you can move out of view. Test your camera's HDR or exposure-bracketing workflow before the paid shoot, particularly when windows are much brighter than the interior. Keith Martin's PanoPress shooting guide provides useful background on consistent capture and scene placement.
Prepare complete spherical photo exports rather than screenshots from a viewer. A stitched equirectangular JPEG is a straightforward starting point: it normally has a 2:1 width-to-height ratio and looks stretched when opened flat. Keep the original camera files and full-resolution exports in your archive.
Use filenames such as 01-entrance.jpg, 02-living-room.jpg, and 03-kitchen.jpg. They make the next steps easier to follow.
Step 2: upload the panoramas to Mirame360
Sign in, open Upload, and select 360° image. Choose Browse file, select a finished panorama, then click Upload. Repeat for the other viewpoints. Keep the page open until the file transfer completes, then allow processing to finish.
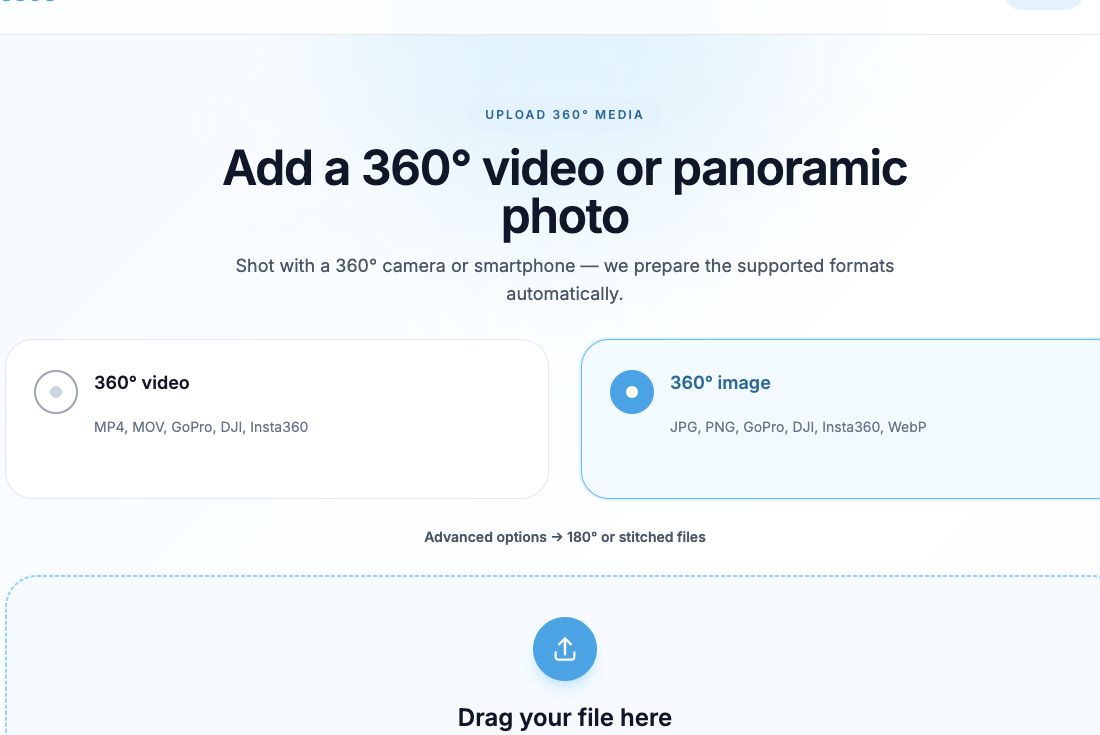
Select 360° image for the room panoramas. This screenshot shows the upload form before a file is selected.
The Advanced options control is for other workflows, including 180° or stitched files. For the already assembled full-sphere photos in this guide, use the normal 360° image route.
Open My Media and check that each panorama is ready. Preview it before adding it to a tour. Look for a level horizon, readable details, and correct stitching. Fix a problematic source image now rather than building navigation around it and discovering the problem during client review.
The screenshots below use panoramas that were already processed in the account's library. The Mirame360 upload documentation covers the preparation and upload options in more detail.
Step 3: create the tour
From My Media, choose Tours. In Create a tour, enter the tour name and description, then click Create tour.
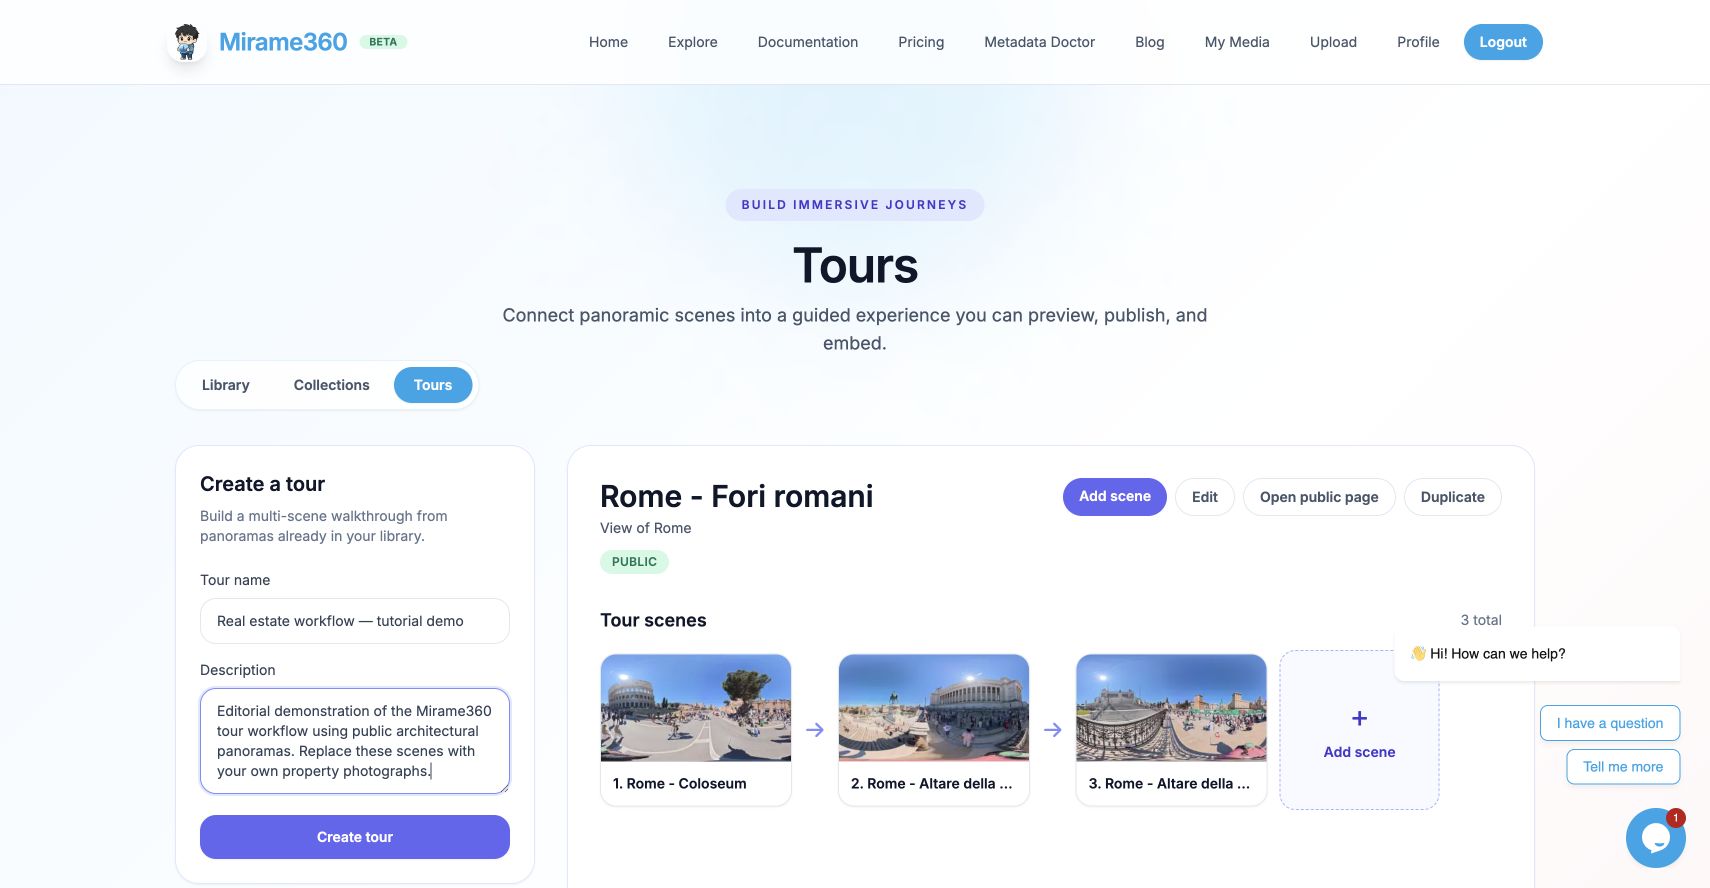
Use the form on the left to create a new tour. The tour visible on the right is an existing example, not the new tour being created.
For a property, choose a name the client will recognize, such as “Two-bedroom apartment — viewing tour.” Use the description to explain what the visitor will see. Avoid putting access codes or private client notes in either field.
The new workspace separates Details, Edit, Revision history, and Analytics. Details controls the tour's presentation and access; Edit is where you assemble the viewing route.
Step 4: add scenes and choose where the tour starts
Open Edit, or click Add first scene if the tour is empty. Under Add panorama, choose a processed photo from the library and click Add scene. Add the remaining panoramas in the same way.
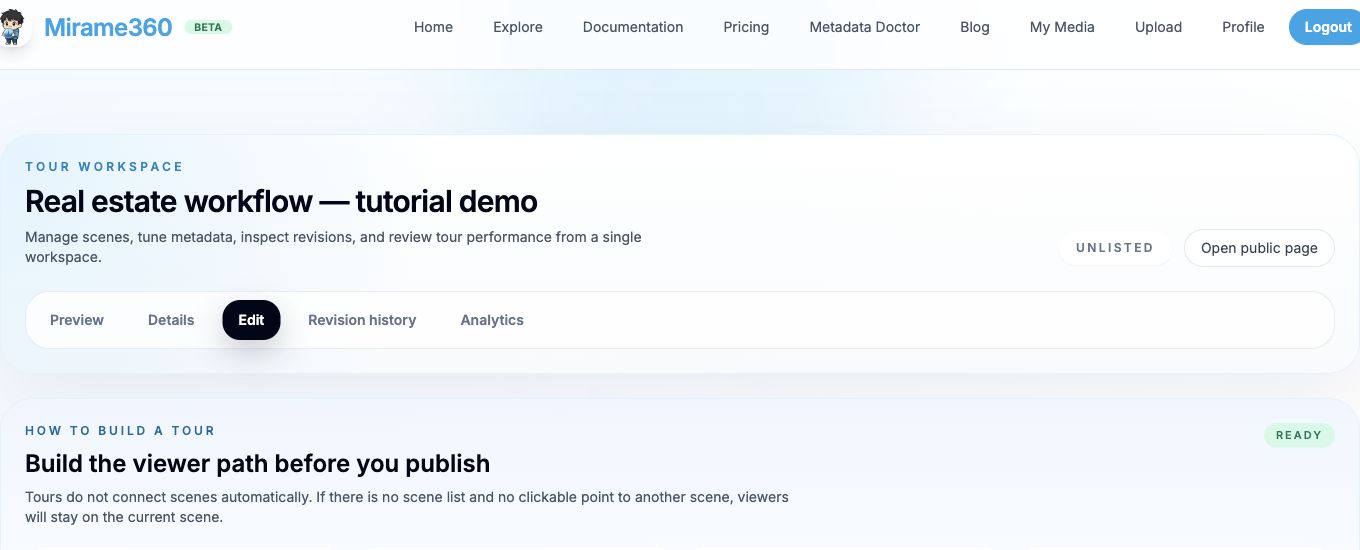
The Scenes panel controls membership, order, and the starting panorama. Selecting a scene opens its editor on the right.
Select each scene to check its Scene title. For a property, use room names that remain understandable in a navigation control: “Entrance,” “Kitchen,” and “Main bedroom” are clearer than camera filenames.
Use Up and Down to change the scene order. Choose Set start on the panorama you want visitors to see first and check the START badge. The first scene in our demonstration was selected automatically, but the badge is worth checking explicitly.
Scene order is not the same thing as a route. Adding two scenes does not automatically place a doorway link between them.
Step 5: connect the rooms with clickable points
Select the scene from which the visitor should move. In its Scene editor, click Place clickable points. The Clickable Point Editor opens over the panorama.
Follow this sequence:
- Click Start adding points, or Enter Edit Mode if that is the control shown.
- Click the position where the navigation point should appear. In a property, place it near the doorway or passage leading toward the next viewpoint.
- Choose Scene link.
- Select the destination in Destination scene.
- Click Add scene link, then Save Changes in the point editor.
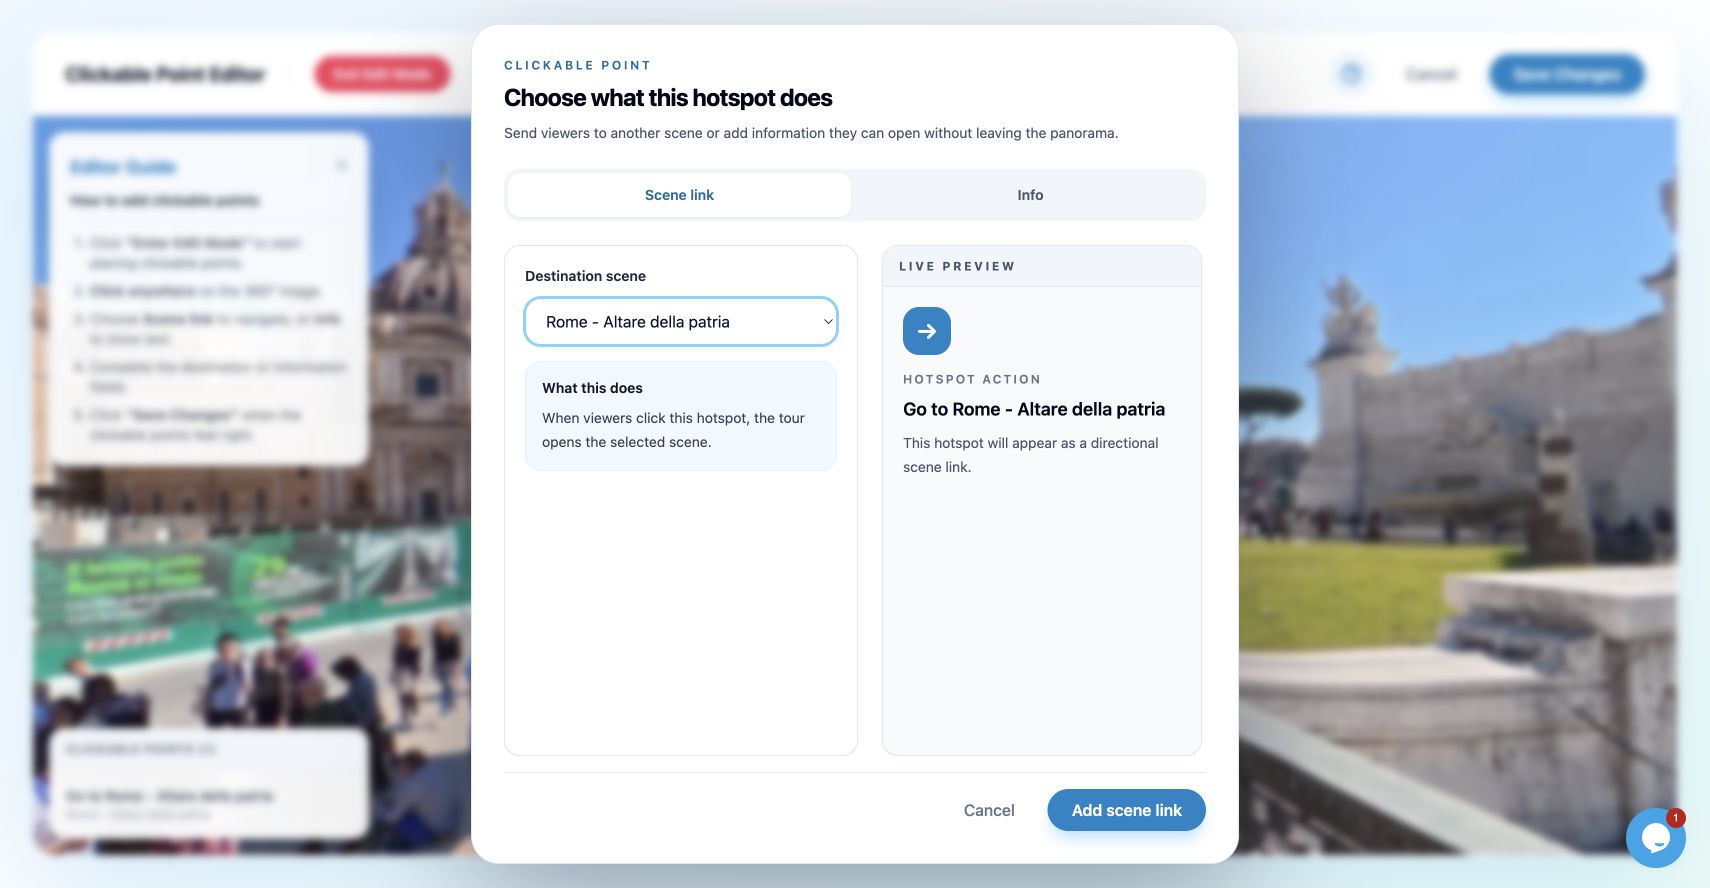
The destination determines which panorama opens when a visitor clicks the arrow. Info points show information instead of moving to another scene.
Now select the destination scene and create a way back. Our example connects the lower architectural viewpoint to the upper one and provides a return link. For a property, make sure every room has a sensible exit.
The Quick links to other scenes buttons are a faster alternative for creating a connection. They create a clickable point to the named scene; inspect its placement before using it in a client deliverable. Use the full point editor when you want the arrow to sit at a particular doorway.
Wait for the saving indicator to finish after changes. Then preview the route. A publish checklist passing does not replace clicking through the tour yourself.
Step 6: preview, enable access, and copy the right link
Use Preview to review the assembled tour. Look around the first scene, click its navigation point, and confirm that the intended destination opens. Test the return route as well. Both directions were exercised in the two-scene demonstration used for this article.
Then open Details. Check the title, description, Cover scene, and Tour URL before delivery. Set the URL early so you are not changing an address after a client has embedded or distributed it.
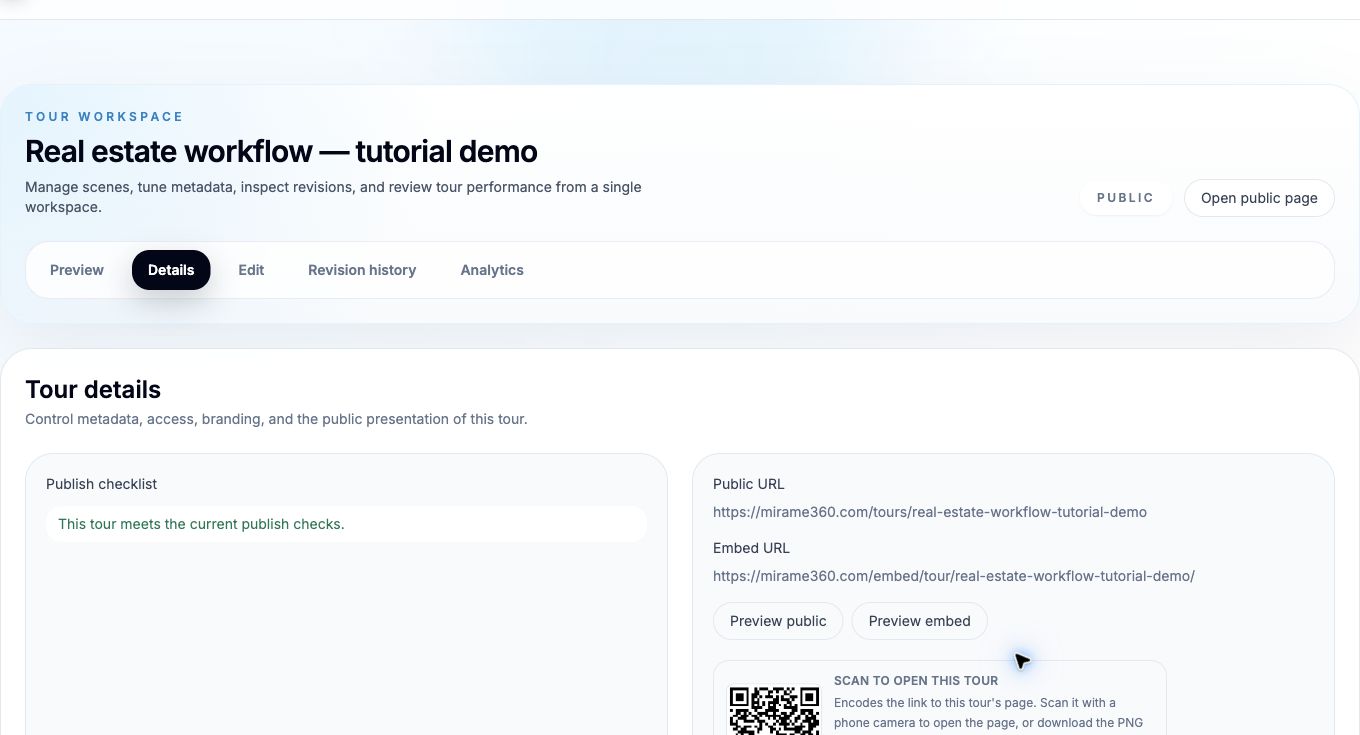
Details contains the viewing and embed addresses. In the captured interface, Public visibility is on and Access is Open for this demonstration.
Read the Public visibility explanation carefully. In the live interface used here, off means the tour is visible only to its owner and is unavailable through the direct link or embed. On makes it discoverable and available through those addresses. A generated URL or QR code is not proof that a visitor can access it.
The Access menu also offers Password protected. Decide the intended audience with your client before making a property tour accessible. Our example uses already public architectural panoramas and open access; it is not an example of private client delivery.
Copy Public URL when the client needs a viewing page. Use Embed URL when adding the tour player to a website. The QR panel's Download PNG provides an image that opens the tour's page when scanned.
For a website that accepts HTML embeds, the demonstration can be placed with:
<iframe
  src="https://mirame360.com/embed/tour/real-estate-workflow-tutorial-demo/"
  title="Mirame360 tour workflow demonstration"
  width="100%"
  height="540"
  style="border:0"
  loading="lazy"
  allowfullscreen>
</iframe>
Replace the src and title with your property's values. A CMS may instead provide an embed block; use the method it supports. Confirm the listing portal accepts the tour link before promising that delivery channel.
Try the finished navigation
This is the architectural demonstration created while documenting the steps above. Drag to look around, then use the blue arrow to change viewpoints. The two views illustrate scene navigation; they are not a room-by-room property walkthrough.
If the embedded player is unavailable, open the demonstration tour.
Step 7: check the delivery as a visitor
Open the final viewing URL in a private browser window, then test it on a phone. This catches links that work only in the owner's session and controls that are awkward on a small screen.
Before handing over the property tour, check:
- The opening scene is useful and its horizon is level.
- Every intended room is reachable, and the visitor can return from it.
- Navigation labels match the destination rooms.
- Reflections and the full sphere have been checked for unwanted personal details.
- The link and website embed work with the intended access settings.
- The client knows what is included and how long hosting will remain available.
Keep the handoff short: “Open this link and drag to look around. Use the arrows to move between rooms.” Include the separate listing photographs and any agreed embed instructions. The client delivery guide covers organizing those deliverables.
Turn the tested workflow into a service
Measure your first complete property job before setting a standard price. Record preparation and shooting time separately from export, upload, tour assembly, quality checks, and revisions. The browser walkthrough in this article is not a capture-time benchmark.
Your quote should account for that work, travel, hosting, and the revisions you include. Start with a clearly scoped tour package and expand it after you understand where your time goes. A customer should know whether a new room, a reshoot, or a later update changes the price.
For your first practice run, choose a space you have permission to photograph, capture a small set of panoramas, and create your Mirame360 account. Finish the viewing link and test every connection before offering the same workflow to a client.